


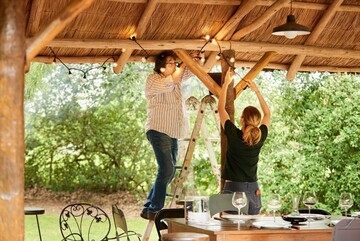
Have you ever gazed out at your patio and thought, “I should make every evening the perfect evening”? I’ve had that thought too. So, I started wondering if it is possible to create a more inviting atmosphere by lighting up my home. Let’s draw attention to the beauty of the patio by simply connecting a dimmer onto the patio lights.
If you can power your lights with an on-and-off switch, a compatible dimmer can replace the switch. Light bulbs that are typically NOT dimmer-compatible are fluorescent, some LEDs, and CFL bulbs. Dimmable bulbs are some LEDs, incandescent, and halogen styles.
If I were asked to guess why most people choose dimmable light bulbs over conventional lights, it would probably be because of their aesthetic benefits. Dimmers are a great way to cut energy consumption, add ambiance, and reduce maintenance costs. However, while all dimmers have these benefits, not all of these devices are created equally.
Now, at this point, you may be having a lightbulb moment, but let’s first check to see if your patio lights are dimmable.
How To Know Your Bulbs and Dimmer are Compatible?
Light bulbs that you can dim are compatible with dimmers, but if the bulb box does not state that a dimmer switch can dim it, the bulb may need more energy, increasing heat and a chance of a fire hazard. So, in addition to checking the manufacturer specs of your light bulb and dimmer controls, researching the dimmer’s compatible specs is the next best way to ensure the dimmer and light bulb are compatible.
Dimming an incandescent or halogen bulb is simple. As
long as the following conditions are met, you can use a dimmer switch with incandescent or halogen light bulbs:
- Dimmer switches are rated for the same voltage as the lighting application. For example, on 120 volts circuits, they use standard dimmers, and on 12V and 24V systems, they use low voltage dimmers.
- All lamps have a total wattage that is less than or equal to the maximum rating on the lighting switch.
If you are only dimming one bulb, this is probably not an issue. But if you control more than one bulb at a time, you will need to add up the total wattage for all the lights. As an example, a 600-Watt incandescent dimmer can support up to eight 75-Watt incandescent bulbs.
Signs Of Incompatibility Between Dimmer And Lights?
Dimmable LED light bulbs and their non-dimmable counterparts use entirely different circuitry from one another. So, it is not likely to put a non-dimmable light bulb on a dimmable circuit and expect it to work correctly.
A dimmer switch, in simple terms, alters the time the electricity cycles back and forth, thus creating different voltages as the outcome. This is why a non-dimmable bulb blinks when you try and dim them. Therefore only working properly at full on the dimmers scale.
Thus, typical complaints include the light bulb not dimming to expected levels, blinking or flickering at particular thresholds, or humming or buzzing. In addition to these problems, dimmers may not be compatible with these devices:
- An abrupt cut in light intensity occurs just before it reaches the lowest end of the dimming range.
- When dimming towards full brightness, the lights brighten more suddenly than expected at a certain point.
- When lighting remains constant throughout the dimming scale, it does not respond to dimmer adjustments.
Turn off the lights and troubleshoot if you experience any of these symptoms, as there is probably nothing wrong with the dimmer or the lights. They’re just not meant to be friends.
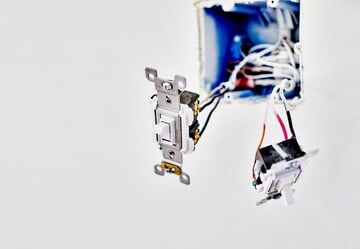
Adding A Dimmer, What Do You Need?
Safety first! Please switch off the power at the breaker box, and mark it out of service. Do not switch on the power again until all work has been completed. Double-check that you have all the right tools to replace the switch between the patio lights and your magical dimmer device. The most common tools necessary would be the following:
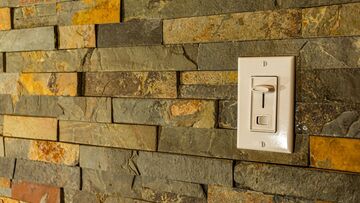
1. Dimmer Type
Not only does it need to be the Compatible dimmer, but there are also several different types of Dimmers, such as sliders and rotary. If necessary, you can choose the style best suited to your décor. Once you have located the switch, it may be a single switch that would require a single-pole dimmer. For example, if it has two switches that control your patio lights, you will need a three-way dimmer switch to connect to only one of the switches.
2. Screw Driver
One man’s most inventive creations, a very handy tool that all of us are familiar with. It will either be a star or flat screwdriver that would be necessary for the job. Like this good Klein Tool set available at Amazon Check Them out here
3. Non-Contact Voltage Detector
Safety always comes first. A non-contact voltage detector will help ensure that there is no longer power to any switches you will be replacing. Recommended non-contact tester on Amazon
4. Insulated Steel Pliers
Another man’s best friend comes in handy in your DIY duties. This tool helps remove cables’ coating, shortening wires and cables, and applying a solid grip to surfaces and objects. Here is a good overall useful pair available on Amazon
5. Wire Nuts
Wire nuts help connect wires and to ensure that they stay in place. Twisting the relevant wires together and screwing on a wire nut will always do the trick to keep them connected. Here is a good set of miscellaneous sizes, good for small wires and low voltage applications up to 220V house circuits. See Kit Here
6. Electrical Tape
The electrical tape always comes in handy in many areas of this process. For example, you can use them on the relevant wires after applying the wire nut to keep them from coming off. Also, you can use them to label a cable, like, say, if you install a three-way dimmer. You can always have a use for electrical tape, it is good to have around, here is a good roll.
There are more challenges you might encounter when you look at the task ahead before attempting it. For example, shortening or lengthening cables might be one of the issues you may encounter when installing a new set of patio lights.
And just like that, you have everything you need to install your dimmer. With the power of your patio’s ambiance level at your fingertips, there should be no evening where your visit to your patio goes to waste.
Patio Lights That Come With Dimmers, or Inline Dimmers
Yes, if you are worried about having to change out light switches or add dimmers to your patio lights, you can simply buy patio lights that already have dimmers and remotes with them. Also, they make inline controllers that you just put in between your outlet and your string of lights.
The problem is in a case like that is you have to change the whole string if something goes wrong, but on the other hand, you can pick these up pretty inexpensive, like these we are using currently from Amazon, see them by clicking here.
You can check out the inline controller for your lights as well by clicking here.
Can You Shorten Any Patio Light Strand?
Trying to tuck away and hide excess cables may be a hassle, especially if you have purchased them online and can’t get them back in the box for a return. Maybe you disappointingly find that you need it to be a little shorter. After unplugging the light from any source of power, how hard is it to determine if they can be cut or not?
This is not a short answer or problem solved, or a simple fix because it depends so much on the voltage and manufactured. In short, yes, you can shorten a cable, but for this article, we will ask you to measure more accurately when choosing the lengths needed.
We recommend for this simple article only cut light strings that are made to be cut. Light strings with female and male end plugs are typically meant to be connected end to end. Shortening these lights could result in voltage changes to the bulbs or the string no longer working. Also, it can void their safety rating and warranty. Patio light strings without end plugs are available that can be cut to any desired length.
Always remember to safely complete any tasks that require you to shorten the cable in the instances as necessary. You should stagger the hot and neutral wires and have black silicone and shrink tubes ready to make a water-proof seal. To learn how to do that, click on this article: coming soon
Wrap up
Most concerns with your dimmer, be it compatibility between lights and dimmer or identifying if the bulbs you have are dimmable, know that there is always a solution. Once that obstacle is covered with all the necessary tools for the job, shortening the cable if necessary, it can be modified to fit comfortably according to the correct safety precautions.
You may also enjoy this article , Patio Lights That DONT Attract Bugs, Which colors are best